「Host management system」の版間の差分
(ページの作成:「Information Technology Team > Host management system __TOC__ == Outline == The University of Tokyo requires that all host terminals accessing the University’s ...」) |
Shitami.junichiro (トーク | 投稿記録) |
||
| (同じ利用者による、間の6版が非表示) | |||
| 1行目: | 1行目: | ||
[[Information Technology Team]] > [[Host management system]] | [[Information Technology Team]] > [[Host management system]] | ||
| + | |||
| + | {| class="wikitable" | ||
| + | | [[端末管理システム|日本語]] | ||
| + | |} | ||
__TOC__ | __TOC__ | ||
| + | <!-- <span style="color: red;">This is a description of the new system that will be used from 13:00 on October 20, 2020.</span> | ||
| + | --> | ||
== Outline == | == Outline == | ||
| − | The University of Tokyo requires that all | + | The University of Tokyo requires that all the computers using the university's network must be properly managed. |
| − | + | A university-wide security firewall is in place. | |
| + | It is recommended that personal computers use a university-wide private network called the PROTECTED network. | ||
| − | + | Depending on the major and facility, the computer may be connected to the conventional networks. | |
| − | + | The SoS DHCP Management system manages the computer that are connected to conventional networks by automatically setting IP addresses by DHCP. | |
| − | |||
== Preparation for use == | == Preparation for use == | ||
| + | |||
=== Subnet administrator === | === Subnet administrator === | ||
| + | |||
Ask the Information Technology Team by e-mail to implement host management using DHCP by the host management system. | Ask the Information Technology Team by e-mail to implement host management using DHCP by the host management system. | ||
| + | |||
For host management, including the process of implementation, see the page below. | For host management, including the process of implementation, see the page below. | ||
| − | * Host management (information for subnet administrators) | + | |
| + | * [[端末の管理|Host management]] (Japanese) (information for subnet administrators) | ||
=== Preparation by users === | === Preparation by users === | ||
| − | + | ||
| − | * | + | To log in to this system, use the client certificate issued by the School of Science account. |
| + | |||
| + | * [[School of Science account]] | ||
== “Login” page == | == “Login” page == | ||
| − | Access the following URL to log into | + | |
| − | * | + | Access the following URL to log into SoS DHCP Management system (subnet administrators can also access the URL to log into the system). |
| + | |||
| + | * [https://dhcp.adm.s.u-tokyo.ac.jp/ SoS DHCP Management system] | ||
== Procedures for using the service == | == Procedures for using the service == | ||
| + | |||
* Visit the URL above to access the “Login” page. | * Visit the URL above to access the “Login” page. | ||
| − | |||
| − | |||
| − | |||
| − | |||
| − | |||
| − | |||
| − | |||
| − | + | [[ファイル:Dhcp2-1.png]] | |
| − | * | + | * A list of registered hosts is displayed. |
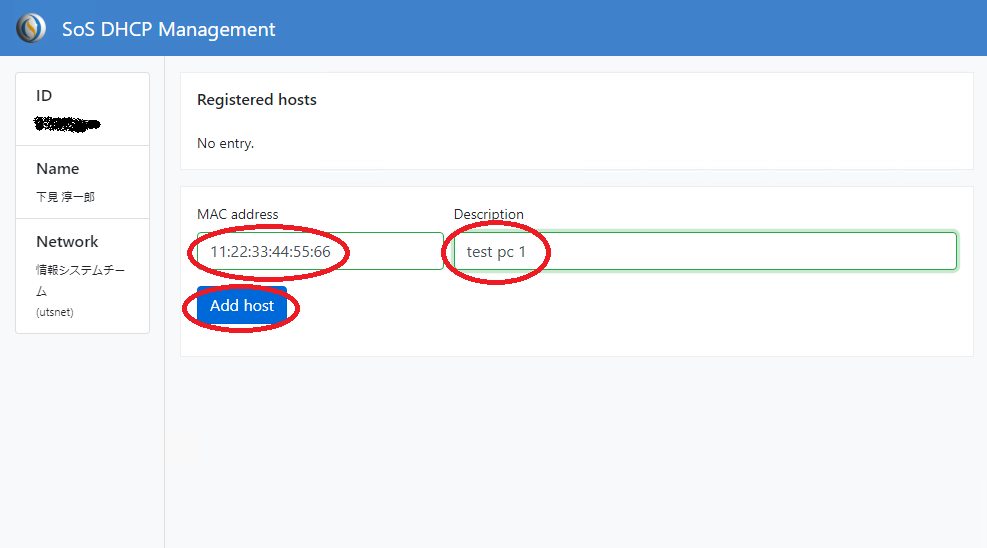
| − | + | * Enter the "MAC address" and "Description" of the computer to be registered and press the "Add host" button to register, and the settings will be reflected in about 10 minutes. | |
| − | |||
| − | * | ||
| − | |||
| − | |||
| − | |||
| − | + | [[ファイル:Dhcp2-2.png]] | |
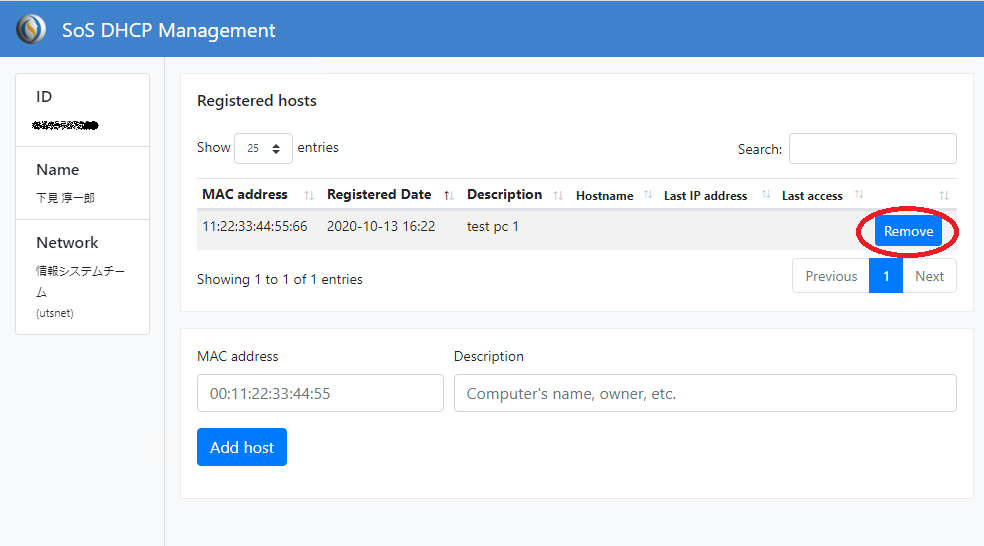
| − | * | + | * You can remove by pressing the "Remove" button on the right side of the registered host. |
| − | |||
| − | |||
| − | |||
== Procedures for administrators == | == Procedures for administrators == | ||
| + | |||
* The “Login” page is the same as that for users. | * The “Login” page is the same as that for users. | ||
| − | * | + | * If you have administrator privileges, the "Admin menu" is also displayed. |
| − | + | * The following menu options are available | |
| − | * The following | + | ** Admins: Add, confirm, or remove subnet administrators. |
| − | * | + | ** Address ranges: Add, confirm, or remove IP address ranges for DHCP. |
| − | * Address | + | ** Registered hosts: Add, confirm, or remove registered hosts. |
| − | * | + | ** Fixed assignments: Add, confirm, or remove hosts with fixed IP addresses for DHCP. |
| − | * Registered: | + | ** Leases: View a list of currently leased IP addresses. |
| − | * | ||
| − | * Fixed | ||
| − | * | ||
| − | |||
| − | |||
| − | + | The first thing you need to set is the address range. | |
| − | + | Enter the range of IP addresses used for DHCP. | |
| − | + | This can be changed at any time. | |
| + | The setting itself will be reflected in about 10 minutes, but the address already in use will be changed after the lease time (30 minutes) has elapsed. | ||
[[Category: Information Technology Team]] | [[Category: Information Technology Team]] | ||
2020年10月20日 (火) 13:13時点における最新版
Information Technology Team > Host management system
| 日本語 |
目次
1 Outline
The University of Tokyo requires that all the computers using the university's network must be properly managed. A university-wide security firewall is in place. It is recommended that personal computers use a university-wide private network called the PROTECTED network.
Depending on the major and facility, the computer may be connected to the conventional networks. The SoS DHCP Management system manages the computer that are connected to conventional networks by automatically setting IP addresses by DHCP.
2 Preparation for use
2.1 Subnet administrator
Ask the Information Technology Team by e-mail to implement host management using DHCP by the host management system.
For host management, including the process of implementation, see the page below.
- Host management (Japanese) (information for subnet administrators)
2.2 Preparation by users
To log in to this system, use the client certificate issued by the School of Science account.
3 “Login” page
Access the following URL to log into SoS DHCP Management system (subnet administrators can also access the URL to log into the system).
4 Procedures for using the service
- Visit the URL above to access the “Login” page.
- A list of registered hosts is displayed.
- Enter the "MAC address" and "Description" of the computer to be registered and press the "Add host" button to register, and the settings will be reflected in about 10 minutes.
- You can remove by pressing the "Remove" button on the right side of the registered host.
5 Procedures for administrators
- The “Login” page is the same as that for users.
- If you have administrator privileges, the "Admin menu" is also displayed.
- The following menu options are available
- Admins: Add, confirm, or remove subnet administrators.
- Address ranges: Add, confirm, or remove IP address ranges for DHCP.
- Registered hosts: Add, confirm, or remove registered hosts.
- Fixed assignments: Add, confirm, or remove hosts with fixed IP addresses for DHCP.
- Leases: View a list of currently leased IP addresses.
The first thing you need to set is the address range. Enter the range of IP addresses used for DHCP. This can be changed at any time. The setting itself will be reflected in about 10 minutes, but the address already in use will be changed after the lease time (30 minutes) has elapsed.

