How to use Webex Meetings
2020年12月10日 (木) 11:25時点におけるFujimoto.miyuki (トーク | 投稿記録)による版
Information Technology Team > Collaboration tool > How to use Webex Meetings
| 日本語 |
1 Roles
Webex Meetings has the following roles.
- Host
- They can start / end a meeting and assign users to “Presenter. ”
- They can also mute / unmute microphones of participants, but participants can cancel it themselves.
- Cohosts
- In addition to closing the event, they can set presenter privileges, control breakout sessions, and move participants to and from the lobby.
- They can also set the participant's microphone mute, but they can also unmute it themselves.
- Compared to the host, you can't control the recording and start of the event, but the rest is pretty much the same.
- Presenter
- They can share the contents, and use a poll to create and share questionnaires.
- If the host has chosen the setting “Anyone Can Share,” the participant who shared the content automatically becomes the presenter.
- When “Anyone can share” is on, any participant can share content in the meeting.
- When “Anyone can share” is off, only presenter set up by the host / Cohosts will be able to share content and manage polling.
- Participants
- They can mute / unmute the microphone and send the camera image. They can chat with other participants and the host.
2 Screen composition
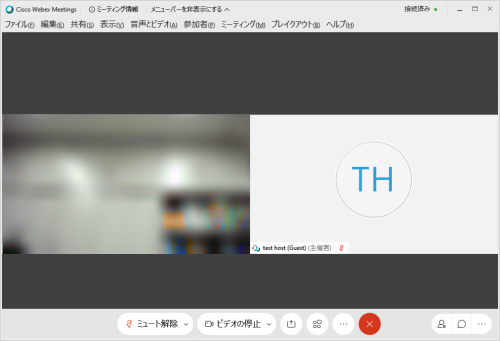
When you enter the conference room, the following screen will be displayed (It looks different if another participant is already in the room).
Buttons are lined up at the bottom of the screen. Hover the mouse over the button to display the name. We will explain from left to right.
- (1) Connect Audio
- If you want to join the meeting with your audio muted, click Mute.
- You'll see Unmute when your microphone is muted. Click Unmute when you want to speak in the meeting.
- Mute your microphone (make the icon Unmute) when you don’t speak. Unexpected sounds may be leaked to other participants if you do not mute the mic.
- While the Webex window is active, you can only unmute while holding down the spacebar (releasing the spacebar will mute it).
- (2) Start Your Video
- If you want to join the meeting with your video turned off, click Stop video.
- You'll see Start video when your video is turned off. Click Start video when you want to show your video.
- If the connection environment is unstable, stop the video (make the icon Start video).
- (3) Share Content
- Share your screens to share materials with other participants.
- You can share your PC screen or share specific application windows.
- It is also used to show a PowerPoint document at hand, to show a video, and to show your writing by connecting to a OH camera, etc. There is also a whiteboard function, so you can share material you have handwritten on your device.
- (4) Record meeting (Host only)
- You can record your meeting.
- You can save it to the cloud (on the Webex server) or your computer, but sometimes it does not allow you to save it to your computer, depending on the setting.
- (5) Breakout Sessions (Host or Cohosts only)
- You can control breakout sessions.
- (6) Other options
- There are other options here.
- (7) Leave
- Leave the conference room.
- (8) Participants
- Press the participant button to display a list of participants.
- In the participant list, you can hover your mouse over each name to send a direct message to that participant or to make that participant leave the meeting from a pull-down menu.
- (9) Chat
- Pressing the chat button will bring up a chat window where you can send a message to everyone or a specific person.
- (10) Panel options
- Pressing the button to dislay Notes window or Polls window.
3 Sign in
- Access https://utokyo-science.webex.com/ .
- Click on “Sign in”
- Enter 10-digit Universal ID@s.u-tokyo.ac.jp in mail address and click on “Next”
- If your 10-digit Universal ID is 1234567890, your Webex login mail address is 1234567890@s.u-tokyo.ac.jp .
- You will be authenticated using client certificate of the School of Science.
4 Initial settings on first sign in
- Configure Personal Room name, Personal Room link and Host PIN in Preferences -> My Personal Room.
5 Start a meeting
- Click on “Home” icon.
- Click on “Start a Meeting”.
- Cisco Webex Meetings application launches. Click on “Start Meeting”.
- Enjoy!

