「School of Science account」の版間の差分
(ページの作成:「Information Technology Team > School of Science network account __TOC__ == Use == A user certificate issued by the School of Science authentication system is use...」) |
Shitami.junichiro (トーク | 投稿記録) |
||
| (同じ利用者による、間の13版が非表示) | |||
| 1行目: | 1行目: | ||
| − | [[Information Technology Team]] > [[School of Science | + | [[Information Technology Team]] > [[School of Science account]] |
| + | |||
| + | {| class="wikitable" | ||
| + | | [[理学系研究科アカウント|日本語]] | ||
| + | |} | ||
__TOC__ | __TOC__ | ||
== Use == | == Use == | ||
| + | |||
A user certificate issued by the School of Science authentication system is used for user identification, data protection, and secure network access. | A user certificate issued by the School of Science authentication system is used for user identification, data protection, and secure network access. | ||
For example, the certificate allows the user to access the relevant Department/laboratory subnet directly from everywhere on the Wi-Fi network. | For example, the certificate allows the user to access the relevant Department/laboratory subnet directly from everywhere on the Wi-Fi network. | ||
| 9行目: | 14行目: | ||
The certificate is valid for the following services. | The certificate is valid for the following services. | ||
| − | * | + | * [[Wi-Fi connection service]] |
| − | * VPN connection | + | * [[VPN connection service]] |
| − | * SSL-VPN connection service | + | <!-- * [[SSL-VPN connection service]] --> |
| − | * File transfer service | + | * [[File transfer service]] |
| − | * Host management system | + | * [[Host management system]] |
== Application for an account == | == Application for an account == | ||
| + | |||
Apply for an account as follows. | Apply for an account as follows. | ||
Ask the relevant Department/Facility (or laboratory/sectional) subnet administrator to apply for an account by submitting the following information. | Ask the relevant Department/Facility (or laboratory/sectional) subnet administrator to apply for an account by submitting the following information. | ||
| + | |||
Information required for the application | Information required for the application | ||
| − | - Name | + | - Name |
| − | - Furigana (Japanese reading) | + | - Furigana (Japanese reading) |
| − | - Affiliation | + | - Affiliation |
| − | - Position (professor, researcher, student, etc.) | + | - Position (professor, researcher, student, etc.) |
| − | - Date of birth | + | - Date of birth |
| − | - Nationality (for non-Japanese applicants) | + | - Nationality (for non-Japanese applicants) |
| − | - Date of enrollment (Date of appointment to the current position) | + | - Date of enrollment (Date of appointment to the current position) |
Student accounts are created/updated collectively by the Information Technology Team at the beginning of each academic year; thus, students do not have to apply for their accounts. | Student accounts are created/updated collectively by the Information Technology Team at the beginning of each academic year; thus, students do not have to apply for their accounts. | ||
| + | |||
Faculty members and guest researchers must apply for registration in the personnel information system (10-digit Universal ID issued after registration also serves as a user ID for the network). Be sure to provide the information listed above to the relevant network administrator. | Faculty members and guest researchers must apply for registration in the personnel information system (10-digit Universal ID issued after registration also serves as a user ID for the network). Be sure to provide the information listed above to the relevant network administrator. | ||
Long-stay guests (staying a month or more) should also indicate their period of stay (stay end date). | Long-stay guests (staying a month or more) should also indicate their period of stay (stay end date). | ||
| 36行目: | 44行目: | ||
=== Downloading === | === Downloading === | ||
| − | + | ||
| + | Please download the client certificate from the user menu of the School of Science account according to the operation procedure on the following page. | ||
| + | You can also change the password of the School of Science account and register the email address used to reset the password. | ||
| + | |||
| + | * [[Downloading a client certificate]] | ||
=== Installation === | === Installation === | ||
| − | Certificate installation on the OS | + | ;Certificate installation on the OS |
Access to the Wi-Fi network requires user certificate installation on the OS running on your terminal. | Access to the Wi-Fi network requires user certificate installation on the OS running on your terminal. | ||
| + | |||
* Double-click the downloaded user certificate to start the Certificate Import Wizard. | * Double-click the downloaded user certificate to start the Certificate Import Wizard. | ||
* Complete the import process as instructed by the Wizard. * Password entry is required. | * Complete the import process as instructed by the Wizard. * Password entry is required. | ||
| − | Click on the following links for details. | + | :Click on the following links for details. |
| − | Windows 7 | + | ::[[Wi-Fi setup for Windows 7#Certificate installation|Windows 7]] |
| − | Windows XP | + | <!-- |
| − | Max OS X | + | ::[[Windows XP の無線設定例#証明書のインストール|Windows XP]] (Japanese) |
| − | + | --> | |
| − | Certificate installation | + | ::[[Wi-Fi setup for Mac OS X#Certificate installation|Max OS X]] |
| − | + | ::[[Wi-Fi setup for iPad#Certificate installation|iPad]] | |
| − | + | ::[[Wi-Fi setup for Linux#Certificate installation|Linux]] | |
| − | |||
| − | |||
| − | |||
| − | + | ;Certificate installation in the Web browser | |
| − | + | :'''Internet Explorer''' | |
| − | * | + | :* The certificate installed on the OS is automatically imported into the Web browser. |
| − | * | + | :'''Google Chrome''' |
| + | :* The certificate installed on the OS is automatically imported into the Web browser. | ||
| − | + | :'''Safari''' | |
| − | * | + | :* The certificate installed on the OS is automatically imported into the Web browser. |
| − | |||
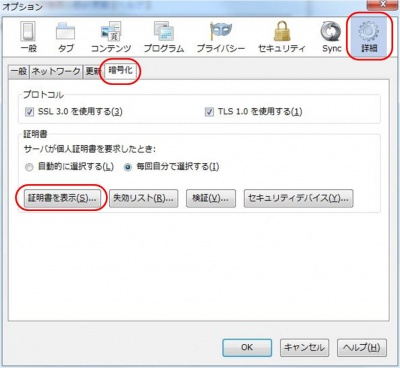
| − | * Open the | + | :'''Firefox''' |
| + | :* Start the Web browser and open the “Options” dialog. | ||
| + | :* Open the “Advanced” tab -> “Encryption” tab and click [View Certificates]. | ||
| + | :*:[[ファイル:01_firefox_ssl.jpg|400px]] | ||
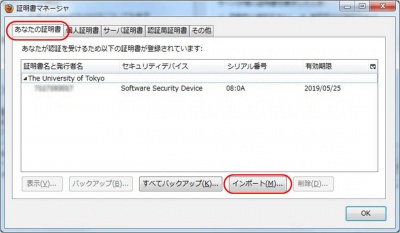
| + | :* Open the “Your Certificates” tab and click [Import] to import the downloaded user certificate. | ||
| + | :*:[[ファイル:02_firefox_ssl.jpg|400px]] | ||
| − | + | <!-- | |
| − | * Start the Web browser and open the | + | :'''Google Chrome''' |
| − | * Open the | + | :* Start the Web browser and open the “Options” dialog. |
| + | :* Open the “Under the Hood” tab and go to the “HTTPS/SSL” section. Then, click [Manage Certificates]. | ||
| + | :*:[[ファイル:01_chrome_ssl.jpg|400px]] | ||
| + | :* Open the “Personal” tab and click [Import] to import the downloaded user certificate. | ||
| + | :*:[[ファイル:02_chrome_ssl.jpg|400px]] | ||
| + | --> | ||
| − | * Open the “Personal” tab and click [Import] to import the downloaded user certificate. | + | :Opera |
| + | :* Start the Web browser and open the “Preferences” dialog. | ||
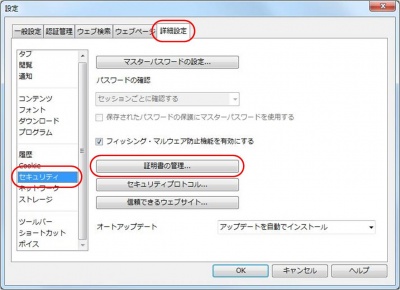
| + | :* Open the “Advanced” tab and go to the “Security” section. Then, click [Manage Certificates]. | ||
| + | :*:[[ファイル:01_opera_ssl.jpg|400px]] | ||
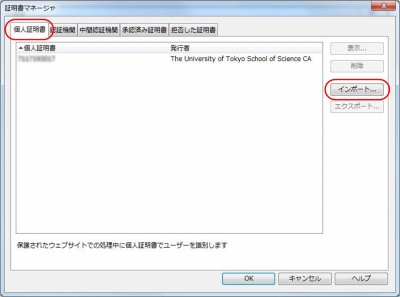
| + | :* Open the “Personal” tab and click [Import] to import the downloaded user certificate. | ||
| + | :*:[[ファイル:02_opera_ssl.jpg|400px]] | ||
[[Category:Information Technology Team]] | [[Category:Information Technology Team]] | ||
2020年2月17日 (月) 17:15時点における版
Information Technology Team > School of Science account
| 日本語 |
1 Use
A user certificate issued by the School of Science authentication system is used for user identification, data protection, and secure network access. For example, the certificate allows the user to access the relevant Department/laboratory subnet directly from everywhere on the Wi-Fi network. A user certificate installed in a Web browser serves as a key for accessing specific Web pages.
The certificate is valid for the following services.
2 Application for an account
Apply for an account as follows.
Ask the relevant Department/Facility (or laboratory/sectional) subnet administrator to apply for an account by submitting the following information.
Information required for the application
- Name
- Furigana (Japanese reading)
- Affiliation
- Position (professor, researcher, student, etc.)
- Date of birth
- Nationality (for non-Japanese applicants)
- Date of enrollment (Date of appointment to the current position)
Student accounts are created/updated collectively by the Information Technology Team at the beginning of each academic year; thus, students do not have to apply for their accounts.
Faculty members and guest researchers must apply for registration in the personnel information system (10-digit Universal ID issued after registration also serves as a user ID for the network). Be sure to provide the information listed above to the relevant network administrator. Long-stay guests (staying a month or more) should also indicate their period of stay (stay end date).
3 User certificate
Users who have an account can download and use their user certificate.
3.1 Downloading
Please download the client certificate from the user menu of the School of Science account according to the operation procedure on the following page. You can also change the password of the School of Science account and register the email address used to reset the password.
3.2 Installation
- Certificate installation on the OS
Access to the Wi-Fi network requires user certificate installation on the OS running on your terminal.
- Double-click the downloaded user certificate to start the Certificate Import Wizard.
- Complete the import process as instructed by the Wizard. * Password entry is required.
- Certificate installation in the Web browser
- Internet Explorer
- The certificate installed on the OS is automatically imported into the Web browser.
- Google Chrome
- The certificate installed on the OS is automatically imported into the Web browser.
- Safari
- The certificate installed on the OS is automatically imported into the Web browser.
- Firefox


