「Wi-Fi setup for iPad」の版間の差分
(ページの作成:「Information Technology Team > Connection to Wi-Fi > Wi-Fi setup for iPad __TOC__ == Certificate installation == * After a certificate download from the authe...」) |
|||
| 4行目: | 4行目: | ||
== Certificate installation == | == Certificate installation == | ||
| − | * After a certificate download from the authentication system, the following screen appears. Tap [Install]. | + | |
| + | * After a certificate download from the [https://sds.adm.s.u-tokyo.ac.jp:8109/user/ authentication system], the following screen appears. Tap [Install]. | ||
| + | |||
| + | [[ファイル:iPad01.png]] | ||
| + | |||
| + | |||
* When the “Unsigned Profile” dialog appears, tap [Install Now]. | * When the “Unsigned Profile” dialog appears, tap [Install Now]. | ||
| + | |||
| + | [[ファイル:iPad02.png]] | ||
| + | |||
| + | |||
* Enter the authentication system login password and tap [Next]. | * Enter the authentication system login password and tap [Next]. | ||
| + | |||
| + | [[ファイル:iPad03.png]] | ||
| + | |||
| + | |||
* Tap [Done]. | * Tap [Done]. | ||
| + | |||
| + | [[ファイル:iPad04.png]] | ||
| + | |||
== Connection to Wi-Fi network == | == Connection to Wi-Fi network == | ||
| + | |||
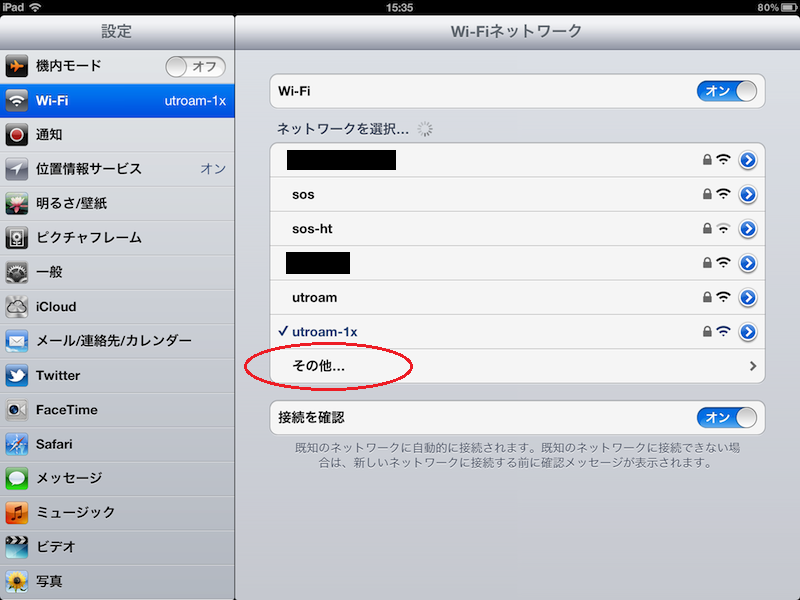
* Choose [Wi-Fi] in the “Settings” pane. In the “Choose a Network …” field, tap [Other…]. | * Choose [Wi-Fi] in the “Settings” pane. In the “Choose a Network …” field, tap [Other…]. | ||
| + | |||
| + | [[ファイル:iPad05.png]] | ||
| + | |||
| + | |||
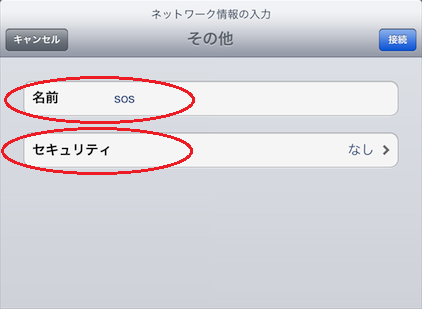
* In the “Enter network information” screen, enter “sos” in the “Name” field. | * In the “Enter network information” screen, enter “sos” in the “Name” field. | ||
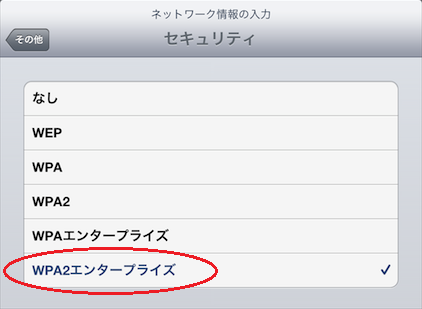
* Tap the “Security” field and select “WPA2 Enterprise”. Tap [Other Network] to return to the previous screen. | * Tap the “Security” field and select “WPA2 Enterprise”. Tap [Other Network] to return to the previous screen. | ||
| + | |||
| + | [[ファイル:iPad06.png]] | ||
| + | [[ファイル:iPad07.png]] | ||
| + | |||
| + | |||
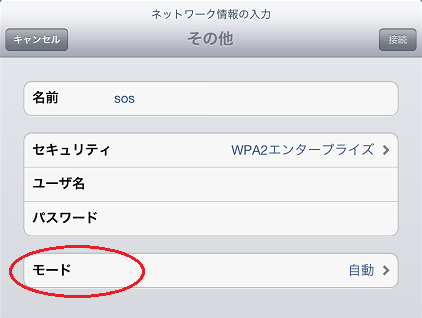
* Selecting “WPA2 Enterprise” adds setting items to the “Enter network information” screen. | * Selecting “WPA2 Enterprise” adds setting items to the “Enter network information” screen. | ||
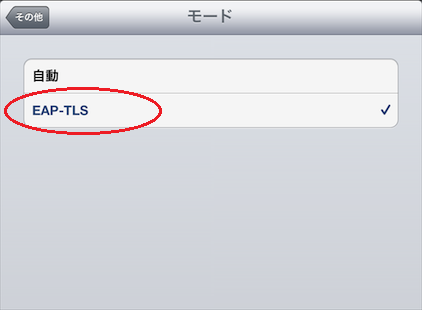
* Tap [Mode] and select “EAP-TLS”. | * Tap [Mode] and select “EAP-TLS”. | ||
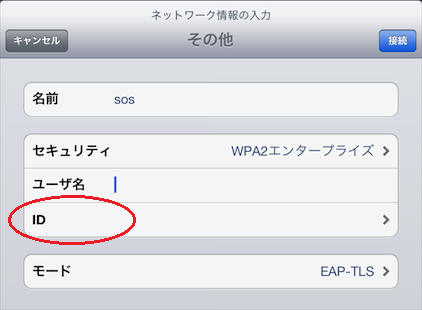
* Tap [Other Network] to return to the previous screen. The “Password” field has changed to the “ID” field. | * Tap [Other Network] to return to the previous screen. The “Password” field has changed to the “ID” field. | ||
| + | |||
| + | [[ファイル:iPad08.png]] | ||
| + | [[ファイル:iPad09.png]] | ||
| + | |||
| + | |||
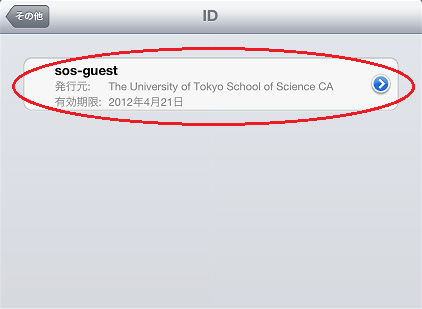
* Tap [ID] and select the installed certificate. Tap [Other Network] to return to the previous screen. | * Tap [ID] and select the installed certificate. Tap [Other Network] to return to the previous screen. | ||
| + | |||
| + | [[ファイル:iPad10.png]] | ||
| + | [[ファイル:iPad11.png]] | ||
| + | |||
| + | |||
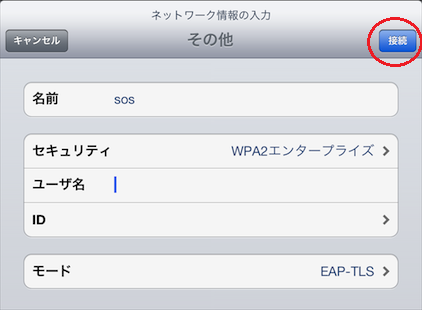
* Leave the “Username” field blank and tap [Join]. | * Leave the “Username” field blank and tap [Join]. | ||
| − | * If authentication has failed, enter the account name (10-digit Universal ID for an individual user certificate or “sos-guest” for a guest certificate) in the “Username” field. | + | ** If authentication has failed, enter the account name (10-digit Universal ID for an individual user certificate or “sos-guest” for a guest certificate) in the “Username” field. |
| + | |||
| + | [[ファイル:iPad12.png]] | ||
| + | |||
| + | |||
* When the certificate is displayed, tap [Accept]. | * When the certificate is displayed, tap [Accept]. | ||
| + | |||
| + | [[ファイル:iPad13.png]] | ||
| + | |||
[[Category: Information Technology Team]] | [[Category: Information Technology Team]] | ||
2013年3月21日 (木) 18:17時点における版
Information Technology Team > Connection to Wi-Fi > Wi-Fi setup for iPad
1 Certificate installation
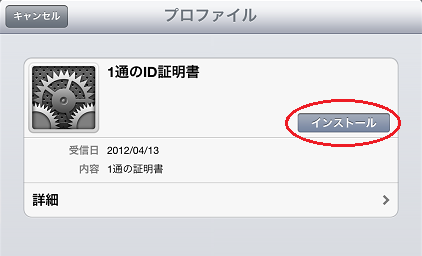
- After a certificate download from the authentication system, the following screen appears. Tap [Install].
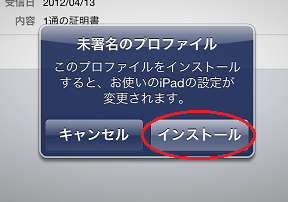
- When the “Unsigned Profile” dialog appears, tap [Install Now].
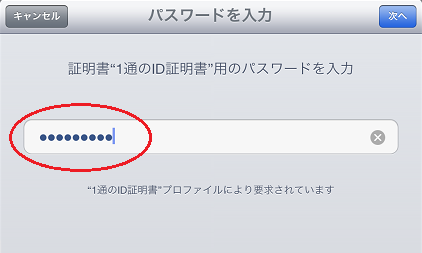
- Enter the authentication system login password and tap [Next].
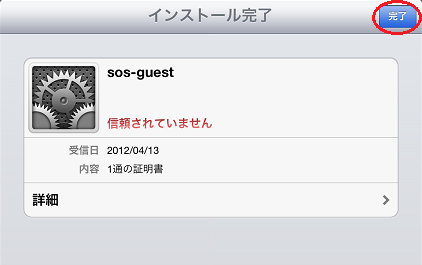
- Tap [Done].
2 Connection to Wi-Fi network
- Choose [Wi-Fi] in the “Settings” pane. In the “Choose a Network …” field, tap [Other…].
- In the “Enter network information” screen, enter “sos” in the “Name” field.
- Tap the “Security” field and select “WPA2 Enterprise”. Tap [Other Network] to return to the previous screen.
- Selecting “WPA2 Enterprise” adds setting items to the “Enter network information” screen.
- Tap [Mode] and select “EAP-TLS”.
- Tap [Other Network] to return to the previous screen. The “Password” field has changed to the “ID” field.
- Tap [ID] and select the installed certificate. Tap [Other Network] to return to the previous screen.
- Leave the “Username” field blank and tap [Join].
- If authentication has failed, enter the account name (10-digit Universal ID for an individual user certificate or “sos-guest” for a guest certificate) in the “Username” field.
- When the certificate is displayed, tap [Accept].
